ผลต่างระหว่างรุ่นของ "Prg2/pacman (applying design patterns)"
Jittat (คุย | มีส่วนร่วม) |
Jittat (คุย | มีส่วนร่วม) |
||
| แถว 100: | แถว 100: | ||
== Dev 1: Observer pattern (for scoring) == | == Dev 1: Observer pattern (for scoring) == | ||
| + | |||
| + | : Read about [https://gameprogrammingpatterns.com/observer.html the pattern here]. | ||
== Dev 2: Command pattern == | == Dev 2: Command pattern == | ||
| + | |||
| + | : Read about [https://gameprogrammingpatterns.com/command.html the pattern here]. | ||
== Dev 1: Flyweight pattern == | == Dev 1: Flyweight pattern == | ||
| + | |||
| + | : Read about [https://gameprogrammingpatterns.com/flyweight.html the pattern here]. | ||
== Dev 2: State pattern == | == Dev 2: State pattern == | ||
| + | |||
| + | : Read about [https://gameprogrammingpatterns.com/state.html the pattern here]. | ||
== Optional work == | == Optional work == | ||
รุ่นแก้ไขเมื่อ 17:33, 17 มีนาคม 2564
- This is part of Programming 2 2563
เนื้อหา
Overview
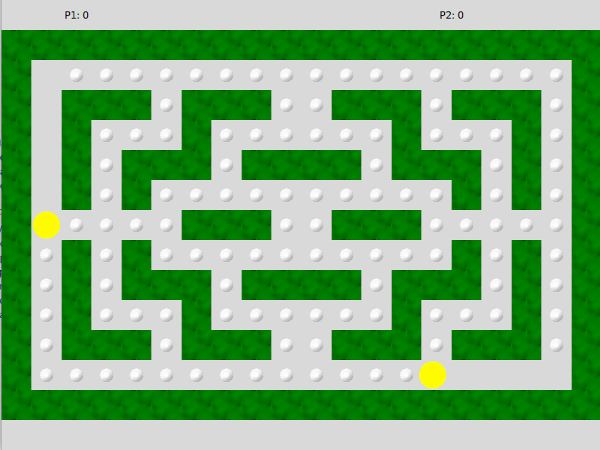
In this assignment, you and your friend will apply design patterns to the provided Pacman code. This version of the Pacman game is a 2-player game, where each player tries to score as many points as possible. The first Pacman is controlled by WASD keys, while the other Pacman is controlled by IJKL keys.
Understanding the current code
There are three main classes:
- PacmanGame
- Pacman
- Maze
PacmanGame
PacmanGame is the main class. It creates a Maze and 2 Pacman's. It feeds two Pacman's with user inputs. The following is its on_key_pressed method, which looks pretty ugly.
    def on_key_pressed(self, event):
        if event.char.upper() == 'A':
            self.pacman1.set_next_direction(DIR_LEFT)
        elif event.char.upper() == 'W':
            self.pacman1.set_next_direction(DIR_UP)
        elif event.char.upper() == 'S':
            self.pacman1.set_next_direction(DIR_DOWN)
        elif event.char.upper() == 'D':
            self.pacman1.set_next_direction(DIR_RIGHT)

        if event.char.upper() == 'J':
            self.pacman2.set_next_direction(DIR_LEFT)
        elif event.char.upper() == 'I':
            self.pacman2.set_next_direction(DIR_UP)
        elif event.char.upper() == 'K':
            self.pacman2.set_next_direction(DIR_DOWN)
        elif event.char.upper() == 'L':
            self.pacman2.set_next_direction(DIR_RIGHT)
While the current game is playable, the scoring function does not work. You will use the Observer pattern to implement score updates.
Pacman
A Pacman is the key object. It works with the Maze to navigate (to avoid running into walls) and eats dots from the Maze. It also handles movement control. The Pacman would continue moving under the recent direction until it hits the walls or a new directional key is pressed. The Pacman does not change directly immediately, but it waits until it arrives at the centers of the "blocks".
Its main functionality can be understood with the following body of its update method. Note the the Pacman maintains its location as an xy co-ordinate, but it communicates with the Maze mostly with row-column positions. Therefore, it has to call maze.xy_to_rc to do the conversion. You can also see that its main logic runs inside the is_at_center if-block.
    def update(self):
        if self.maze.is_at_center(self.x, self.y):
            r, c = self.maze.xy_to_rc(self.x, self.y)

            if self.maze.has_dot_at(r, c):
                self.maze.eat_dot_at(r, c)

            if self.maze.is_movable_direction(r, c, self.next_direction):
                self.direction = self.next_direction
            else:
                self.direction = DIR_STILL

        self.x += PACMAN_SPEED * DIR_OFFSET[self.direction][0]
        self.y += PACMAN_SPEED * DIR_OFFSET[self.direction][1]
This game maintains two Pacman's. Since each Pacman's behavior is controlled purely inside each object, having two Pacman is not a very difficult task. (You can even have more Pacman's if you like.)
Maze
Maze (in maze.py) is a class for handling the maze including wall checking, book keeping on dots, and also for displaying the maze in the canvas itself. It uses a lot of Dot's and Wall's sprites.
class Dot(Sprite):
    def __init__(self, app, x, y):
        super().__init__(app, 'images/dot.png', x, y)

        self.is_eaten = False

    def get_eaten(self):
        self.is_eaten = True
        self.hide()


class Wall(Sprite):
    def __init__(self, app, x, y):
        super().__init__(app, 'images/wall.png', x, y)
Notes: If you recall, each Sprite also creates a tk.PhotoImage, with the same photos. You will use the Flyweight pattern to reduce the number of PhotoImage objects needed.
Getting started
This is a two-student work (so that you can also practice git, again). So start by finding an assignment partner. One of the student should use the following template as a starter:
- Template: tk-pacman
After creating a new repository, the owner of the repository should add another student as a collaborator. This is the same steps as in the previous assignment (see how to add collaborators here).
The descriptions of the assignment below are marked with Dev 1 and Dev 2. This is a guideline for dividing works, but your team can split the work differently; however, you should make sure that each of the team member has an opportunity to help implement at least one design pattern.
Dev 1: Observer pattern (for scoring)
- Read about the pattern here.
Dev 2: Command pattern
- Read about the pattern here.
Dev 1: Flyweight pattern
- Read about the pattern here.
Dev 2: State pattern
- Read about the pattern here.
